

For starters you should know I'm totally a CHEAP ASS BITCH!! Don't get me wrong... I totally have expensive taste. Prince Charming is well aware that if he totally screws up, it will require a trip to Zales for something that sparkles (and I'm not talking something synthetic and sterling!). But short of my BLING... I'm the type of woman who shops the clearance racks and watches pirated movies online.
Lucky for you, this thriftiness is about to benefit you because you don't have to spend a dime to edit your own photos. This edit was done completely with my favorite piece of software... Paint.net ...which is a FREE download from THIS SITE. Simply go there and click the link in the top right to download the program. I do believe you can do this edit with Photoshop as well if you happen to have it. As a matter of fact, I don't know all the programs available, but as long as you have a program that lets you add layers and blurs, you can do this.
And if you're totally not in the mood
-------------------------------------------------------------------
This does require you to have a little understanding of layers, blurs and resizing. If you have just downloaded the program, or haven't got to know your own program yet... I suggest you pour a drink and play around with a couple of photos before jumping into this. It really is E-A-S-Y... but if I go into every detail as if you'd never seen a computer, my fingers would fall off before I finished. So newbies... just play with it. If the 50+ year old Queen can learn to work this program while I cussed at her from 250 miles away... you can do it too!!
So without further ado... the instructions on how to created a mirrored frame effect.
-------------------------------------------------------------------
Step 1: Open the damn program and open the picture you want to use. I assume you already have these magnificent photos that have had the teeth whitened, blemishes removed and cellulite shaved off because that too is more than I'm going to get into right now!
Step 2: Create a new image file with a copy of your image. You should now have two identical images. If you had two images before you started... you should sober up first. If your two images are not identical... you should take your medication first.
Step 3: Resize Image B to 85% and then Resize the Canvas to 117%. This is the hardest step of the whole thing. If you did it correctly, you should have a picture that looks like this:

If your image is not centered... Undo (ctrl+Z) and try again, making sure you anchored your image in the center. If your image does not have a frame around it... you resized IMAGE twice... remember, the second time, you're resizing the CANVAS.
Step 4: Use the magic wand tool to select the white frame and press the delete button on your keyboard to remove it. If you're using an Apple... fuck off... figure it out on your own because I have no clue!

Step 5: Add 4 new layers (that's a total of 5 geniuses!)
Okay... so that's the end of the steps. But we're not finished! (You thought I'd leave you hanging like that?) From here on, I'm just going to go layer by layer.
Layer #3: No I'm not starting at 1 you dork! Why would I do that when you already have layer #3 done? All you have to do is take the layer your image is currently on and move it into the 3rd position (third from the top... and bottom). TADA!!! I'm so proud of you!
Layer #1: (BOTTOM LAYER) Remember when I said you should have 2 identical images to start out. Sure hope you didn't think I was kidding because now you're going to go back and copy the original image into this layer. It should be the right size to fill the whole canvas, but adjust it if you need to. Now add a Gaussian Blur of 15 to this layer. Done!

Layer #2: Use your paint bucket to fill this layer with a color of your choice. When in doubt, use white... but I like to use whatever color is the neutral in my picture. You can play around with this later to see what looks best so don't worry too much about the color. What matters is that you make this layer Multiply using layer properties. It'll basically adds a tint to the blurred 'frame' without ruining the image below.

Layer 4: This is a shadow to add depth to your frame as if the picture is behind it. Use your magic wand (hahaha... put the fairy wings down bitch!) to select the empty frame space around the image in Layer 3. Now go back to Layer 4 and use the pain bucket to paint the entire frame space black. Invert your selection (ctrl+I) so the inside of the frame is selected and Gaussian Blur to 15. Invert again to highlight the frame and delete the black frame. You should have a thin black shadow left behind for a nice touch.
And if you want to go really hog wild, finish it off with one more detail...
Layer 5: This is going to be a highlight on the frame to add a bit of dimension to it. Use you magic wand to highlight that empty frame space around the image in Layer 3. Then make sure you're working on Layer 5. Invert your selection (ctrl+I) and use the paint bucket to paint the space inside the frame white. Invert the selection again (the frame is selected now) and Gaussian Blur to 15. Invert again (inside selected) and delete the white center. Lastly, use layer properties to set the opacity to 133.
-------------------------------------------------------------------
I liked the final outcome so well, I saved it to use as a template. Now I just switch out my pictures and my shadows and highlights are already in place. Here's a few examples just for fun.
Don't forget to tell me what you think, and DEFINITELY tell me if you try this out for yourself... I'd love to see the results! And since I did throw this out there to tempt you with, I suppppppOse I'll help you out if you happen to get stuck. And I won't even cuss at you like I did The Queen (unless of course I figure out you didn't even have the computer plugged in). Happy Editing!
 |
| The Ogre Child |
 |
| The Princess or The Jester? |
 |
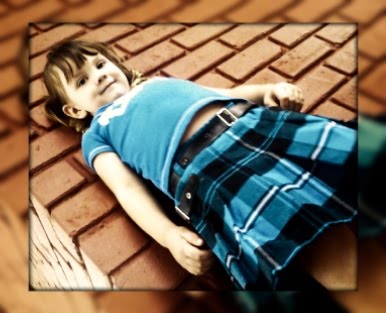
| Before the Heist |
 |
| The O.C. and The Queen |
Too cool.. and when I need it done,, I'll send you the pictures.. cause I'm a DORK like that..
ReplyDeleteHey girl, you should check out Picnik.com as well .. lots of amazing photo edits for free, and its like 2 bucks a month for a membership if you want full access!!
ReplyDeleteThat looks like fun, but too much work for this computer challenged woman. I will just send it your way and you can surprise me! You would have to do more than yell at me from 250 miles away.
ReplyDeleteLoved seeing photos though of the Royals!
I love what you did. It rocks.
ReplyDeleteBut, I started whimpering after step three and then my fucking head exploded after layer 2.
That is why you are the techie/artist wonder Princess and I am an old drunken Dutchess.
Too fucking cute bitch!!!
ReplyDeleteAny luck finding the beer tab crown amongst the good tupperware??
I'm more of an Illustrator Slut that a Photoshop whore...
love ya bitch!
Thanks so much for sharing the love today!
ReplyDeletehey, you have to go read this. It's right up your alley. The dude wants to sell his daughter into slavery cause the bible says he can..
ReplyDeleteit's on one of my favorite blogger's site
http://dailylifewithbipolar.blogspot.com/2010/08/but-what-does-it-say-about-pygmies-with.html#comment-form
Well the Dutchess said I should come and flatter you so I can be adopted!
ReplyDeleteCan I just say you rock that fucking makeup! And that jester hat is the shit!
Love your posts and here is a bottle of fucking good wine to celebrate your awesomeness!
YOU HAVE AWARDS OVER AT MY PLACE http://dailylifewithbipolar.blogspot.com/2010/08/awards-and-doable-btches.html :)
ReplyDeleteQueen - You know it's way easier when you're sitting in my livingroom. Why weren't you sitting in my livingroom when I was trying to teach you HTML?
ReplyDeleteElizabeth - Ironically, the mirrored frame idea actually came from Picnik. I wanted to duplicate the effect without paying for their premium effects :D
Amy - You could so do it... serious... but I'm glad you liked the pics.
Dutch - I forgot you needed 'special' instructions. I should have been specific and told you to sober up AND take your medication before you tried this!
CB - What can I say, it's the egotistical whore in me. I love pictures... especially of ME! And I'm so not telling you where the damn crown is! I'm also not devulging what I found stashed up the ass of the ceramic dog... but it was some GOOOD SHIT!!
SoccerMom - is that what I shared? I hope no one got knocked up *wink*
Queen - Great! I needed to increase my to-do list. I don't have enough to do!
Amy - Adoption? Is that what she's calling it now? I thought it was more like HAZING! But flattery will get you everywhere! Wine might get you laid!! Damn!! I just might adopt you yet!
Donda - Thanks a million! Totally heart you!